
Posts by khailey:
-
latency heatmaps in D3 and Highcharts
August 12th, 2013See Brendan Gregg’s blog on how important and cool heatmaps can be for showing latency information and how average latency hides what is really going on:

Now if we want to create heatmap graphics, how can we do it? Two popular web methods for displaying graphics are Highcharts and D3. Two colleges of mine whipped up some quick examples in both Highcharts and D3 to show latency heatmaps and those two examples are shown below. The data in the charts is random just for the purposes of showing examples of these graphics in actions.
Highcharts Heatmap
see code at http://jsfiddle.net/vladiweb/GNd3G/
D3 Heatmap
see code at
http://jsfiddle.net/eyalkaspi/YH8sw
Popularity vs Productivity vs Performance
July 22nd, 2013This is a reposting with some updates of a post from a couple of years ago. It is a huge decision to make at the beginning of a project as to which language to use and why. As the founder of Slideshare said when asked if he regretted not using Java instead of Ruby his response was that the question was mute, that he wouldn’t even be there talking if he had use Java. Sure Java would have scaled better and Ruby had concurrency issues but Slideshare would not have succeeded, at least not as fast, or possibly not even existed had they used Java.
Related is a discussion of functional programming verses object oriented programming
- http://blog.fogus.me/2013/07/22/fp-vs-oo-from-the-trenches/
- https://news.ycombinator.com/item?id=6083770
Update Aug 2013
Fascinating article about how languages are becoming more expressive
http://redmonk.com/dberkholz/2013/07/23/are-we-getting-better-at-designing-programming-languages/
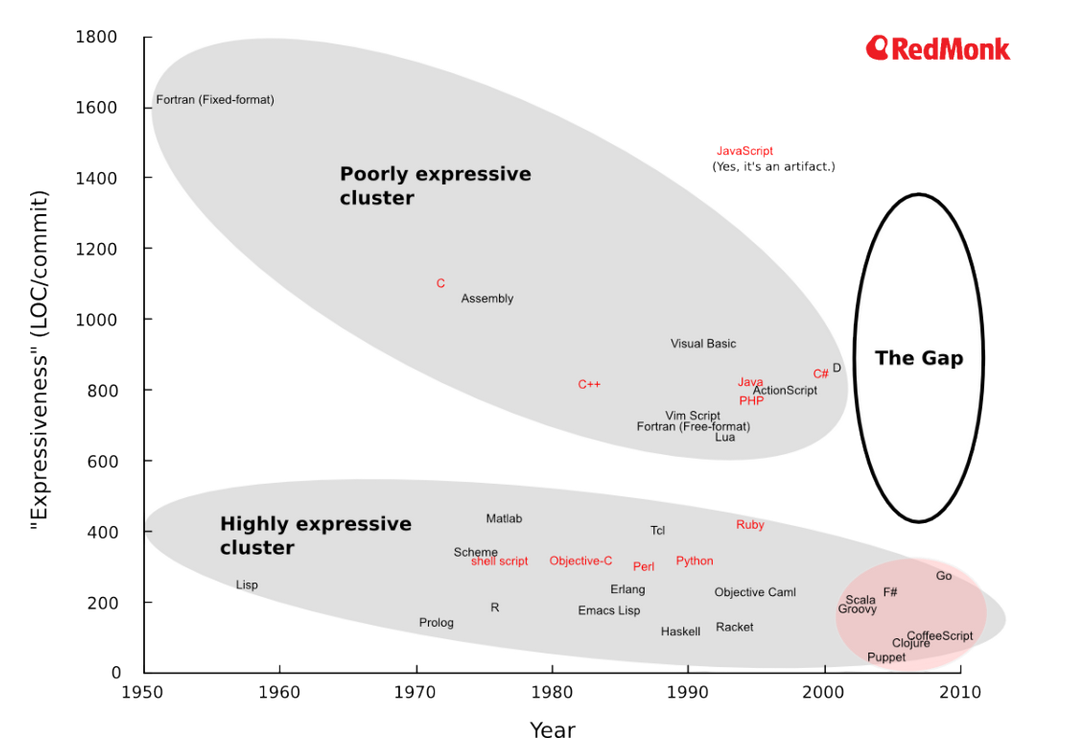
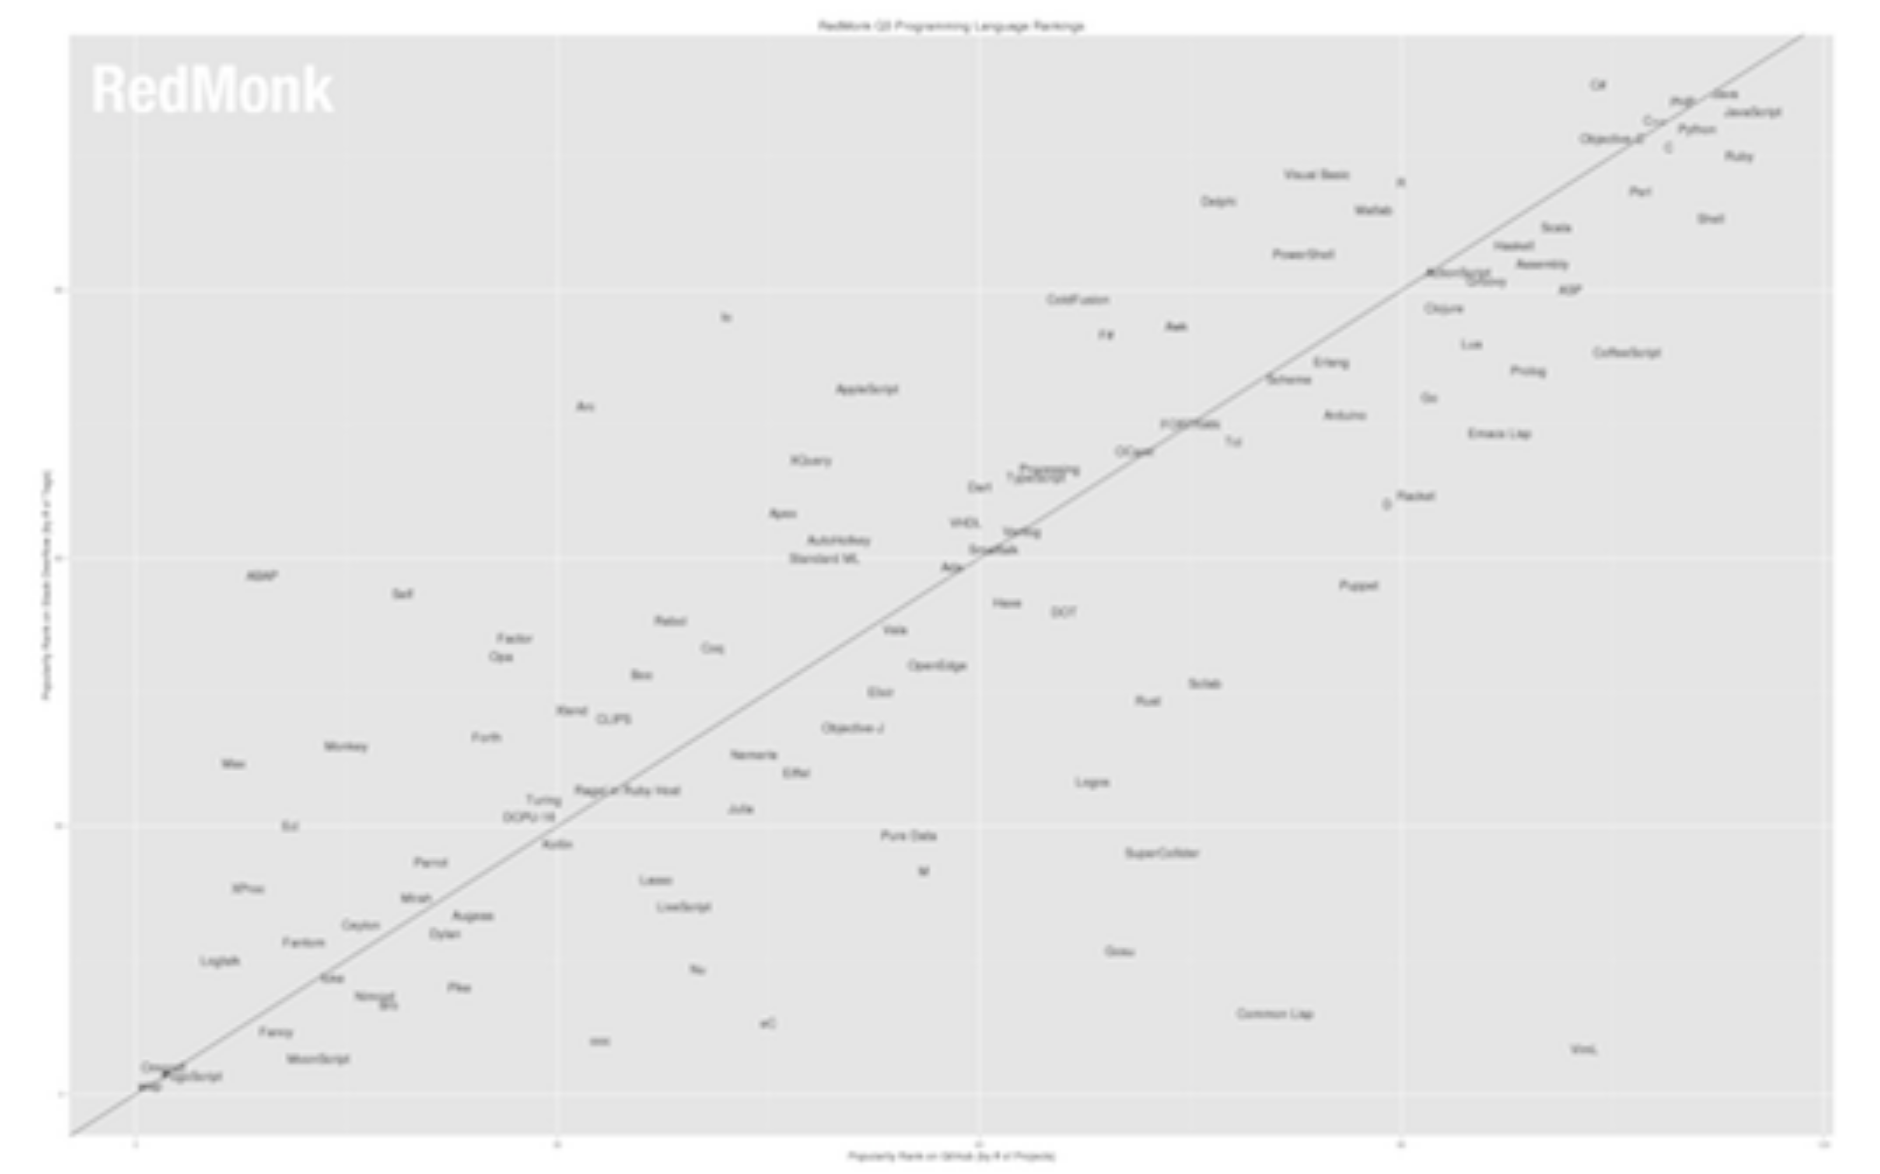
http://redmonk.com/sogrady/2013/07/25/language-rankings-6-13/
Update July 2013:
Larry Wall: “Java is sort of the Cobol of the 21st century” , http://www.youtube.com/watch?v=LR8fQiskYII
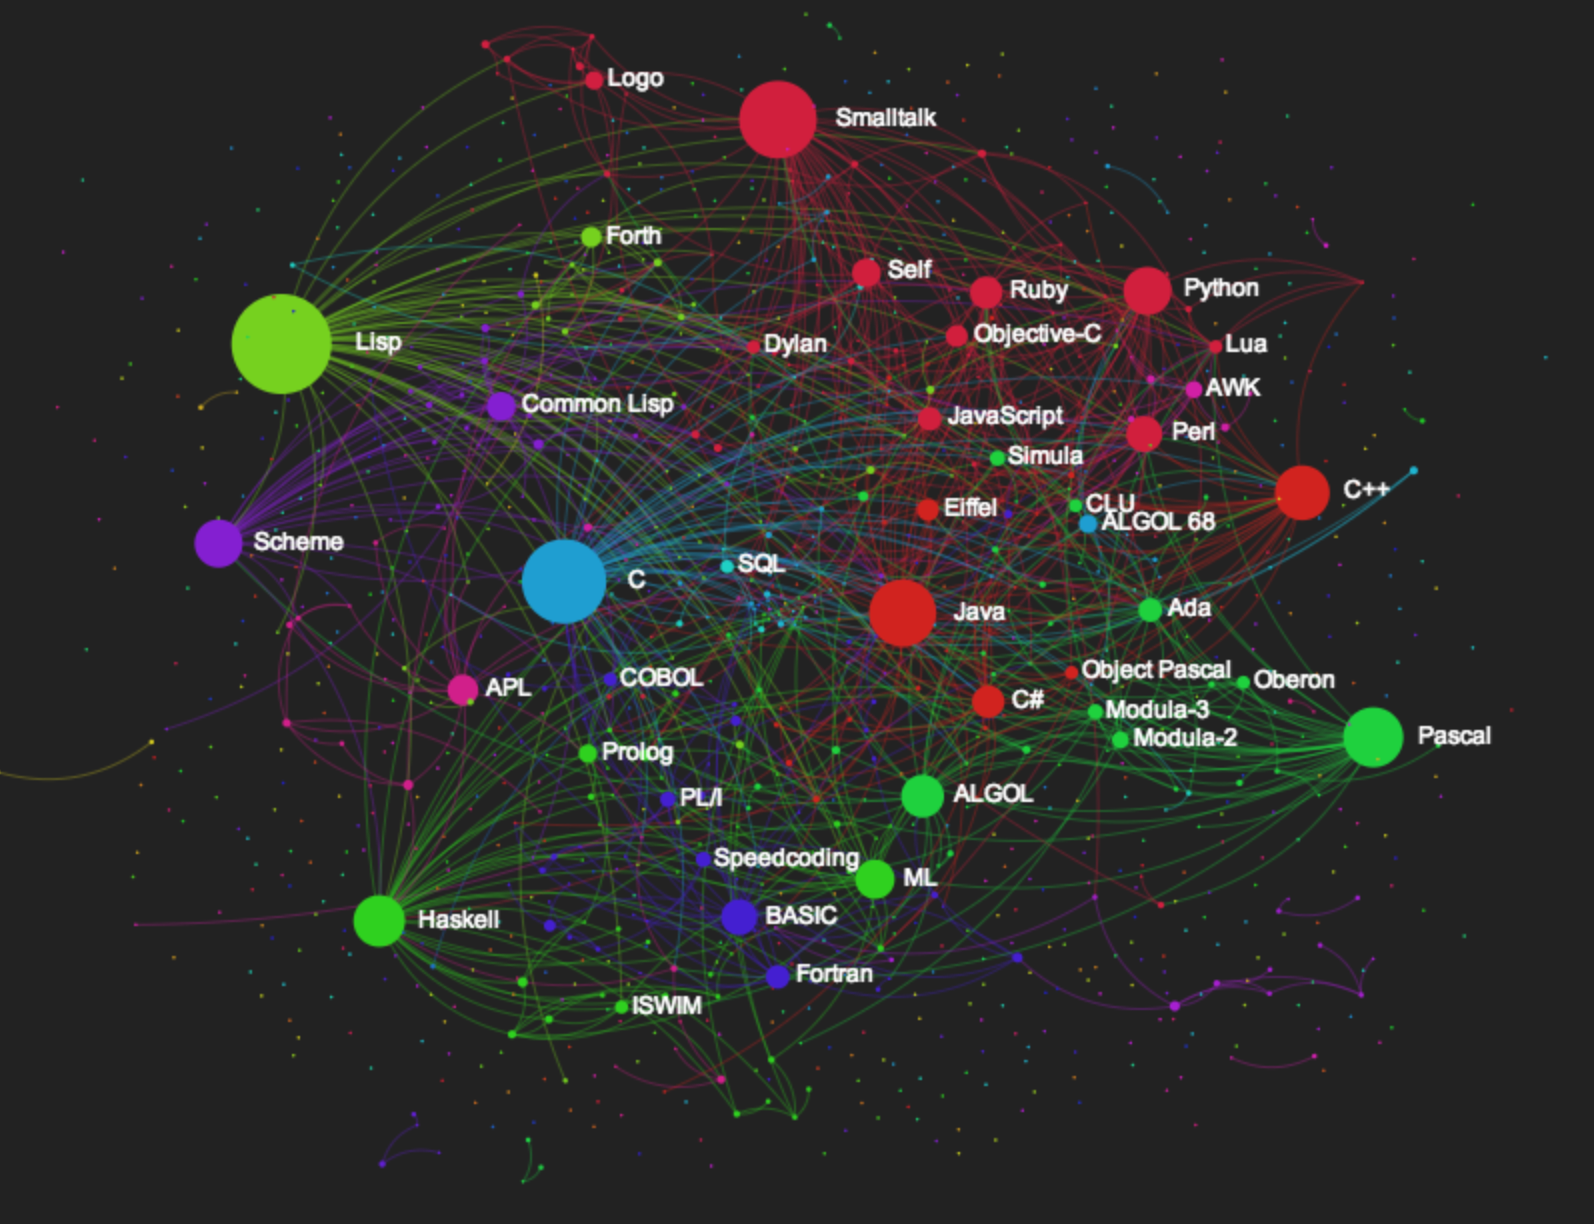
Another perspective on languages , the most influential languages:
Update June 2013: Python rockets to ascension and Java becomes lack luster
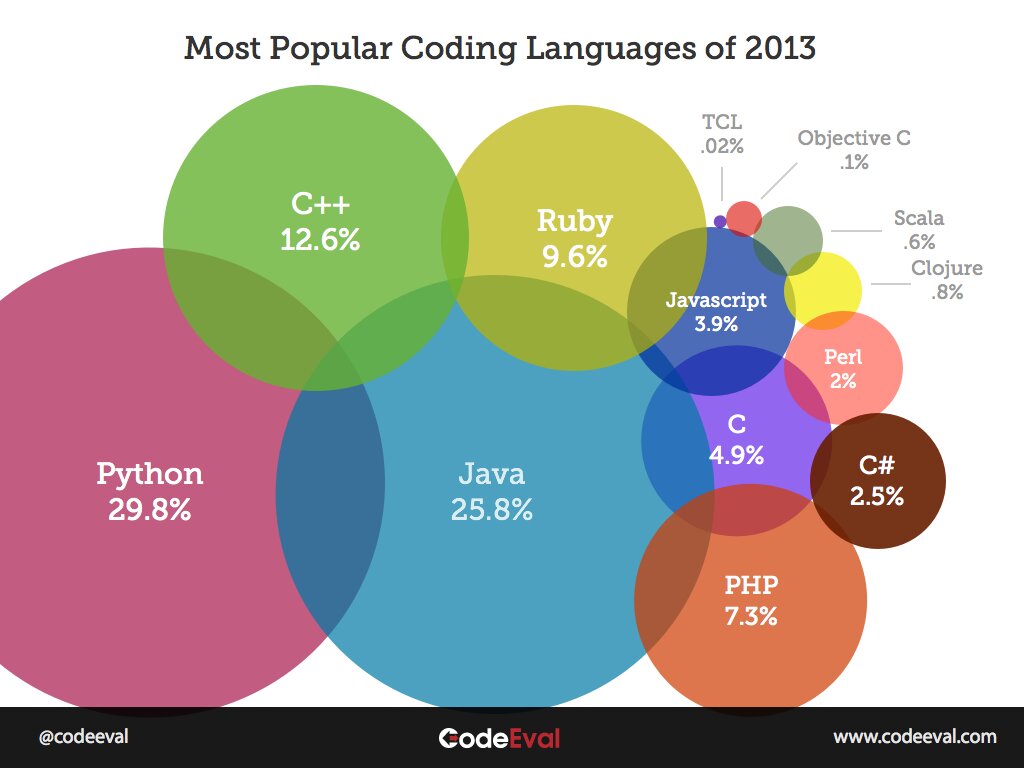
http://blog.codeeval.com/codeevalblog/most-popular-programming-languages-of-2013
What to choose
A more popular car will have better servicing as parts and skills will be common. A fast car is compelling but sometimes speed is easily sacrificed for comfort.
Recently the question of language efficiency verses productivity has been nagging me. The nagging question includes what languages, frameworks and packages are best for collecting data, analyzing data and exposing the data in a rich UI via a web browser.
Productivity
Here is an interesting graphic on speed of the programs in various languages

http://hinchcliffe.org/img/weblanguagecomparison2.png
Now the above graphic might be hard to read (wish it was larger) but what it is indicating is that Python is roughly 10x times slower in execution time to than the equivalent programs in Java. On the other hand the expected productivity gain for a programmer is 5-10x faster in Python than Java. Now on the surface my reaction is “OK, it’s faster to program in Python, ok, but Java is 10x faster so it’s clearly the choice!”, but if I put the numbers into real life I’m like OMG – imagine a Python program that takes 1 day to write, now that same program would take 5-10 days in Java!? Thats a huge deal. Hands down, I’m going to program in Python (or something other than Java). I can deal with some runtime performance issues.
Should a company program in Java or Python? What if Python would take a year to bring to market? What if the Java verison took 5-10 years ?! When asked whether if he could go back and recreate Slideshare in some other language than Ruby,Jonathan Boutelle, said the question is mute. If they had written it Java instead of Ruby they wouldn’t even be having the conversation. Sure Ruby had some scaling issues for them, but they released Slideshare on the market and became successful.
Here is another graphic on productivity from the book “From Java to Ruby”

The data is base on a study of productivity in C, Java, Perl, Python: http://page.mi.fu-berlin.de/prechelt/Biblio//jccpprt_computer2000.pdf
As far as productivity comparisons, I think the following two images of Python vs Java explain it nicely:
Python
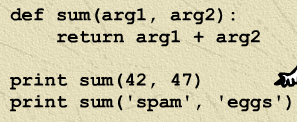
Java equivalent
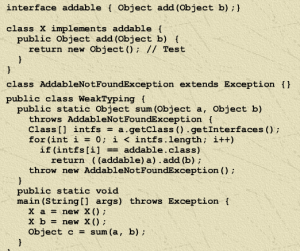
http://blog.chenzhongke.com/2010/05/why-python-is-more-productive-than-java.html
For a down and out dirty view of Java sprawl that further exacerbates productivity check out:
http://chaosinmotion.com/blog/?p=622
(as a rebuttal try pursing hello world in gnu packaging : http://ftp.gnu.org/gnu/hello/hello-2.6.tar.gz )
Performance
Here is a fascinating site with empirical data on speed of languages


http://shootout.alioth.debian.org/
Current speed might be a bit misleading as popularity will impact the efforts put into the issues of a language and a language that is popular though maybe less efficient will see improvements, for example it’s interesting to see the improvements in Java over the years, and now to see the improvements in Ruby. Though Ruby is slower than Scala and Scala’s productivity may even be better than Ruby, Scala doesn’t, yet, have the market momentum, thus the assurances that it is a language to invest in now.
Also if speed of the language is an issue the solution is not to throw the baby out with the bathwater, ie throw out the productive programming language altogether and go for a fast one such as C or JAVA but to find the areas of slowness in the productive framework and replace those with a fast function in another language, ie polyglot programming.
Popularity
another interesting image on the current usage of languages:

http://www.dataists.com/2010/12/ranking-the-popularity-of-programming-langauges/
Languages mentioned in job postings as % and % increase


http://www.soa-at-work.com/2010/02/it-job-trends-which-technologies-you.html
The issues of showing total growth verses % growth lend itself well to heat map representation. Here is a heat map from O’Reilly:

(Interesting to all the Oracle folks: PL/SQL shows a 51% growth 2007-2008.
Here is data from O’Reilly on growth over time, showing Python and C# growing steadily:

http://radar.oreilly.com/2009/02/state-of-the-computer-book-mar-22.html
http://radar.oreilly.com/2011/02/2010-book-market-4.html
Tiobe Index

http://www.tiobe.com/index.php/content/paperinfo/tpci/index.html
Here is google trends normalized by C programming (with out normalization all trends are down because google trends show hits normalized by all traffic and as general traffic increases verses computer geek searches general computer geek searches trend downwards)

Interesting how Ruby seems to be trending down (as normalized against C searches)

another perspective: Google Insights:
Google Insights for Search 
Gadgets powered by Google Just for Fun
here is how I started my morning, a fun video on Python, that catalyzed the above discussion: http://blip.tv/play/g4VigqrwEgI%2Em4v
other links
- humor relief to this blog post:A cheeky st0ry of programming languages http://james-iry.blogspot.com/2009/05/brief-incomplete-and-mostly-wrong.html
- popular programming languages: http://www.readwriteweb.com/hack/2012/06/5-ways-to-tell-which-programming-lanugages-are-most-popular.php
- hello world in different JVM/CLR languages http://carlosqt.blogspot.com/2010/06/most-active-net-and-jvm-languages.html
SQL joins visualized in a surprising way
June 26th, 2013see more at: SQL tuning with VST
Saw a good posting on SQL joins today that echoes a classic image of SQL joins:
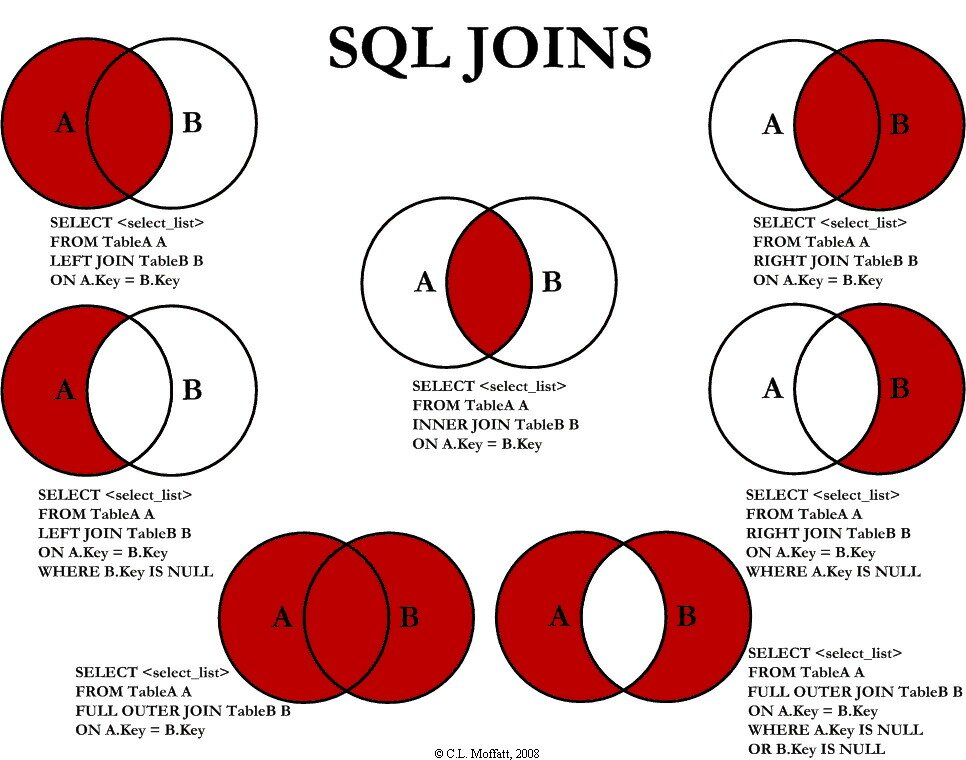
I loved this graphic when I first saw it. Seeing the graphic made me think “wow, I can actually wrap my mind around these crazy SQL joins.”
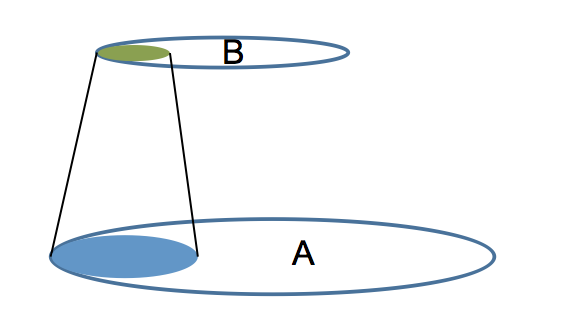
But there is more to SQL joins than meets the eye, at least in these pictures. These pictures leave out the effects of projection and amplification. For example, just taking the simplest case of a two table join (an inner join):
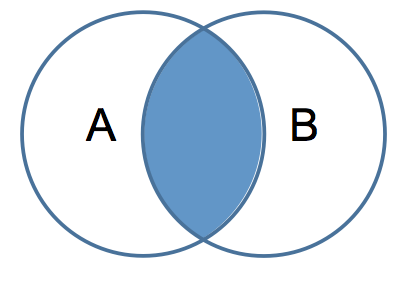
The intersection in the above graphic makes sense and looks simple, but to get a simple intersection requires that the two sets, the two tables, be related by one-to-one relationships. Let’s take a simple query to illustrate the point:
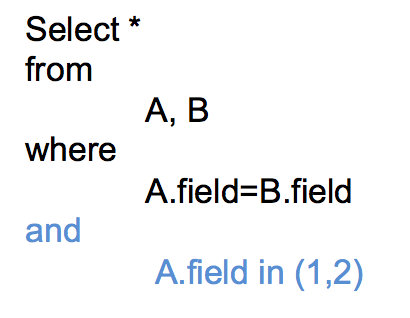
In the query we join tables A and B. In blue I’ve added a “predicate filter” which limits the rows that are joined.
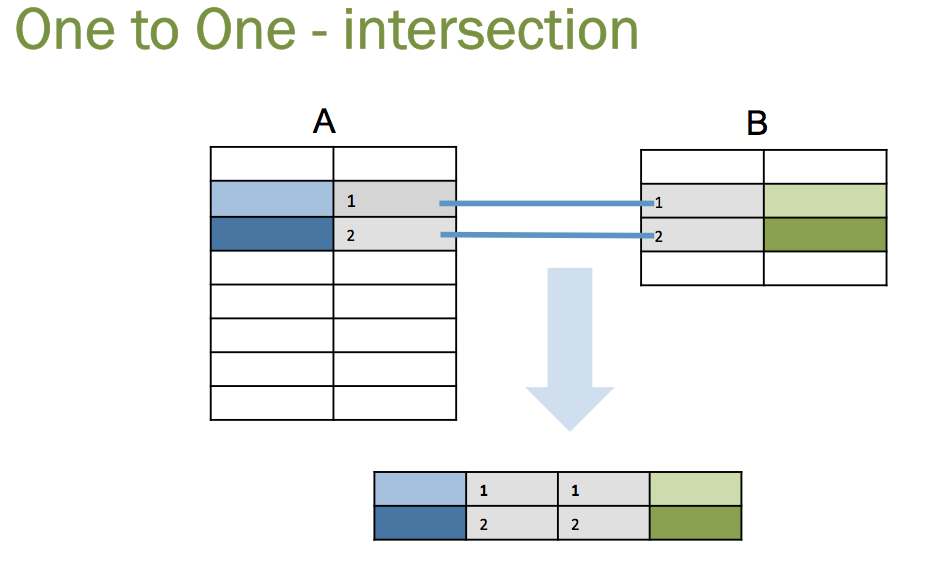
In a one to one relationship, for every value 1 in table A.field there will be one and only one value in table B.field. This is what the join diagram is showing, but how often do data models have one-to-one relationships? Sure it happens once in a while but the main relationship is one-to-many, which actually causes projections and not intersections.
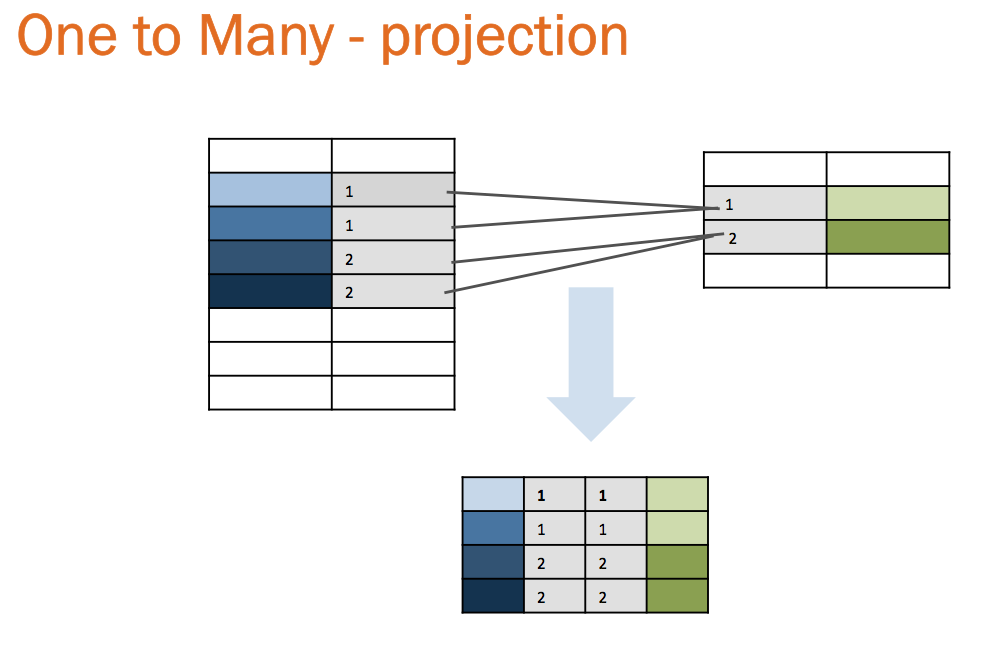
Most often tables are related by a one to many relationship, a parent to child relationship. For example one customer can have many orders, but each order pertains to one and only one customer. With one to many we no longer get the neat intersections of two circles but a “projection” of one set onto the other. The number of rows is limited by the maximum rows returned by the predicate filter in table A and B.
The most surprising case is amplification or multiplying of rows returned due to many-to-many relationships and thus illustrating part of the reason why many-to-many relationships are problematic
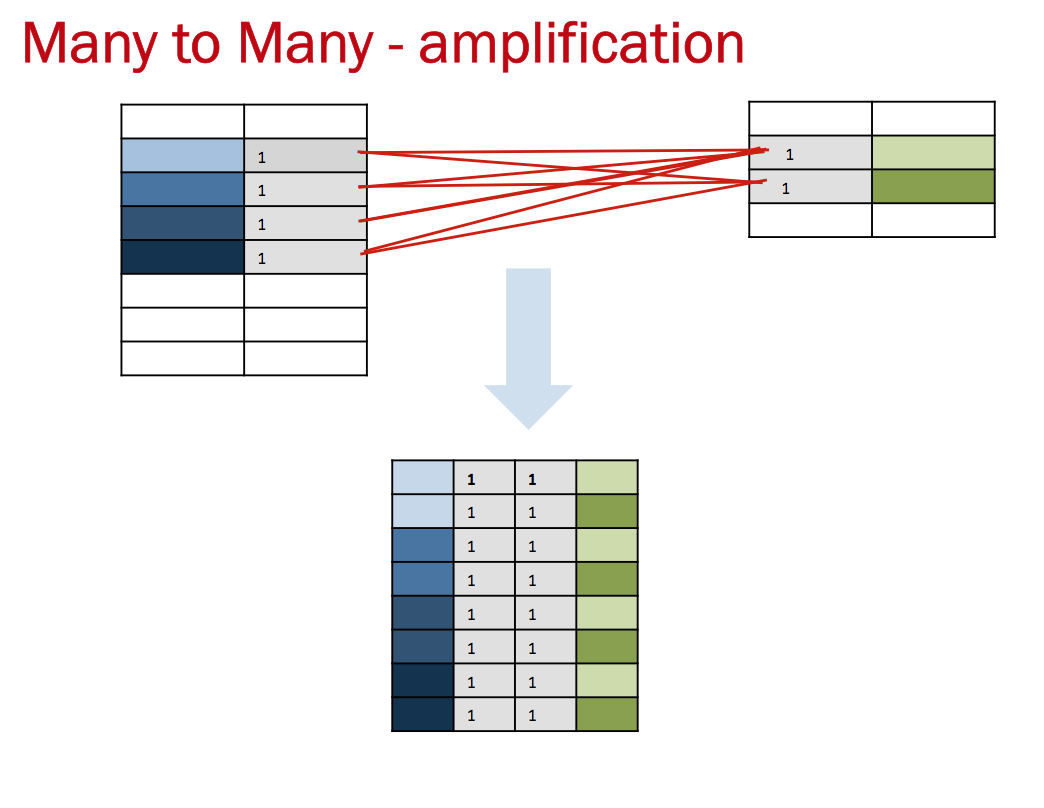
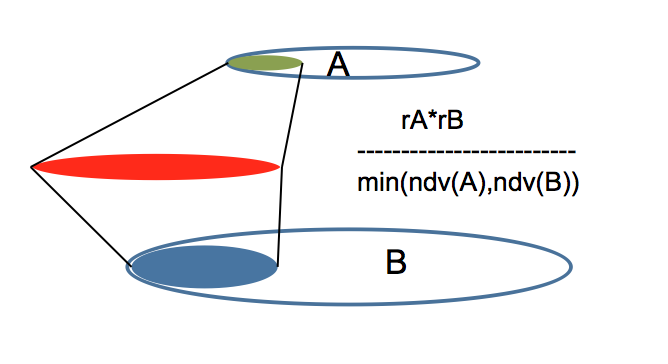
With many to many relationships, the maximum rows returned is the number of rows returned in A with the predicate filter multiplied by the number of rows in B returned after the predicate filter all divided by the minimum of the number of distinct values (NDV) returned on A or B after the predicate filter is applied.
In the above example that is (4*2)/ min(1,1) = 8
With more rows returned by either or both of table A and B, the effect can flood a query with rows to process.
All of this illustrates to me that SQL can be complex, more complex than the useful graphics at the top of the page would suggest.
KScope 2013: win DB Optimizer License at SQL Tuning presentation
June 24th, 2013SQL Tuning Methodology
Wednesday, June 26th Session 13, Bayside C from 11:15 – 12:15 onGiving way 2 free copies of DB Optimizer at presentation ($4000 of software)

On Wednesday 11:15 at ODTUG aka KSCOPE 2013 in New Orleans I’ll be giving away 2 copies of Embarcadero’s DB Optimizer which automates SQL tuning analysis as presented in the book SQL Tuning by Dan Tow.Dan Tow has developed a step by step methodology to find an optimal execution plan for a SQL query.
The core of Dan’s SQL tuning methodology is based on a visual approach. The visual approach lays out the SQL query in a directed graph where direction is based on the parent child relation between tables. Given the directed graph layout and knowing which tables have predicate filters one can quickly find the efficient paths that can be used to execute the query. One can solidify the analysis with information about the percent of rows return on tables with predicate filters and the join cardinalities between tables in the query. Embaradero’s DB Optimizer does all of this analysis automatically.
- DB Optimizer’s Visual SQL Tuning
- Jonathan Lewis writes about Visual SQL Tuning
- Craig Martin’s presentation on how to use Dan Tow’s method
On Wednesday at Kscope I’ll be giving a modified version of these slides on slideshare.
I’ll also be talking about database thin cloning on database thin cloning and database virtualization
Delphix: Instant Database Cloning and Changing the Development ParadigmTuesday, Jun 25, 2013, Session 7 , 9:45 am – 10:45 amSQL Tuning MethodologyWednesday, June 26th Session 13, Bayside C from 11:15 – 12:15 on
Webcast June 19th: Jonathan Lewis – Expert Look at Delphix
June 12th, 2013 Live webcast: Jonathan Lewis – An Oracle Expert’s Look at the Delphix Technology
Date: Wednesday, June 19 @ 9am PT
Click Here to RegisterJonathan Lewis joins us for the 2nd webcast of 3 in his series on Delphix technology and his experiences. Jonathan came out to the Delphix offices in California in March and kicked the tires on the product for a few days and had a chance to talk to some of the creators of Delphix, ZFS, DTrace and Active Dataguard at the Delphix offices.
The first webcast was an informal discussion of his experiences. This second webcast will also be informal but more technical.
Please send us questions by commenting on this blog post and we will try to incorporate the questions into the webcast
Some of the areas we may talk about are
Introduction
- motivation for virtualizing databases covering some use cases that database virtualization solves.
Ease of Use of Delphix
- link to a source database
- provision a virtual database clone
- eadministration automates of change collection and purging of old data.
Delphix on a laptop
- Jonathan and I have set up Delphix on our laptops and we will discuss a bit on how this has worked for us.
- Demo of Delphix (either on laptop or on a “real” machine”)
Technical explanations
ZFS
- ZFS “Keeps a copy of every new version of a block”
- ZFS equivalent of the read-consistent index that gives you the file as at any point in time
- Awareness of Oracle block size – setting logical ZFS block size to Oracle block size
- Being able to compress the ZFS logical block to a smaller number of sectors
- Special case of empty blocks compressing to fit the ZFS meta-data entry
Source database linking
- RMAN full backup run by delphix
- Delphix uses RMAN tape library APIs
- RMAN backup from SCN
- Allows consistent versions of database for EVERY incremental backup taken, forever
- Enable ctwr (block change tracking) to minimise backup times
- Ability to copy all redo logs, and keep up with online redo logs so able to start from any level 1 and roll forward to any point before next level 1
- How old versions of data blocks from the backup history can be dropped when there are no snapshots that depend on them so that the backup keeps rolling forward in time without needing a whole new starting snapshot to be taken
- The complexity of making this task efficient
- The importance and benefit of being able to do it.
Virtual Database
- Creating a vDB and how the new data is created without a history trail and unchanged datablocks come from a snapshot and are mostly the original backups.
Related blog posts by Jonathan’s blog
- http://jonathanlewis.wordpress.com/2013/02/06/delphix/ – intro to visit at Delphix
- http://jonathanlewis.wordpress.com/2013/03/22/delphix-debrief/ – debrief from visit Delphix
- http://jonathanlewis.wordpress.com/2013/03/09/virtual-db/ – EMC vs NetApp
- http://jonathanlewis.wordpress.com/2013/04/04/delphix-overview/ – write up on experiences with Delphix
- http://jonathanlewis.wordpress.com/2013/06/18/delphix-2/ – annouces 2nd webcast
Colored Heat Maps in SQL*Plus
May 10th, 2013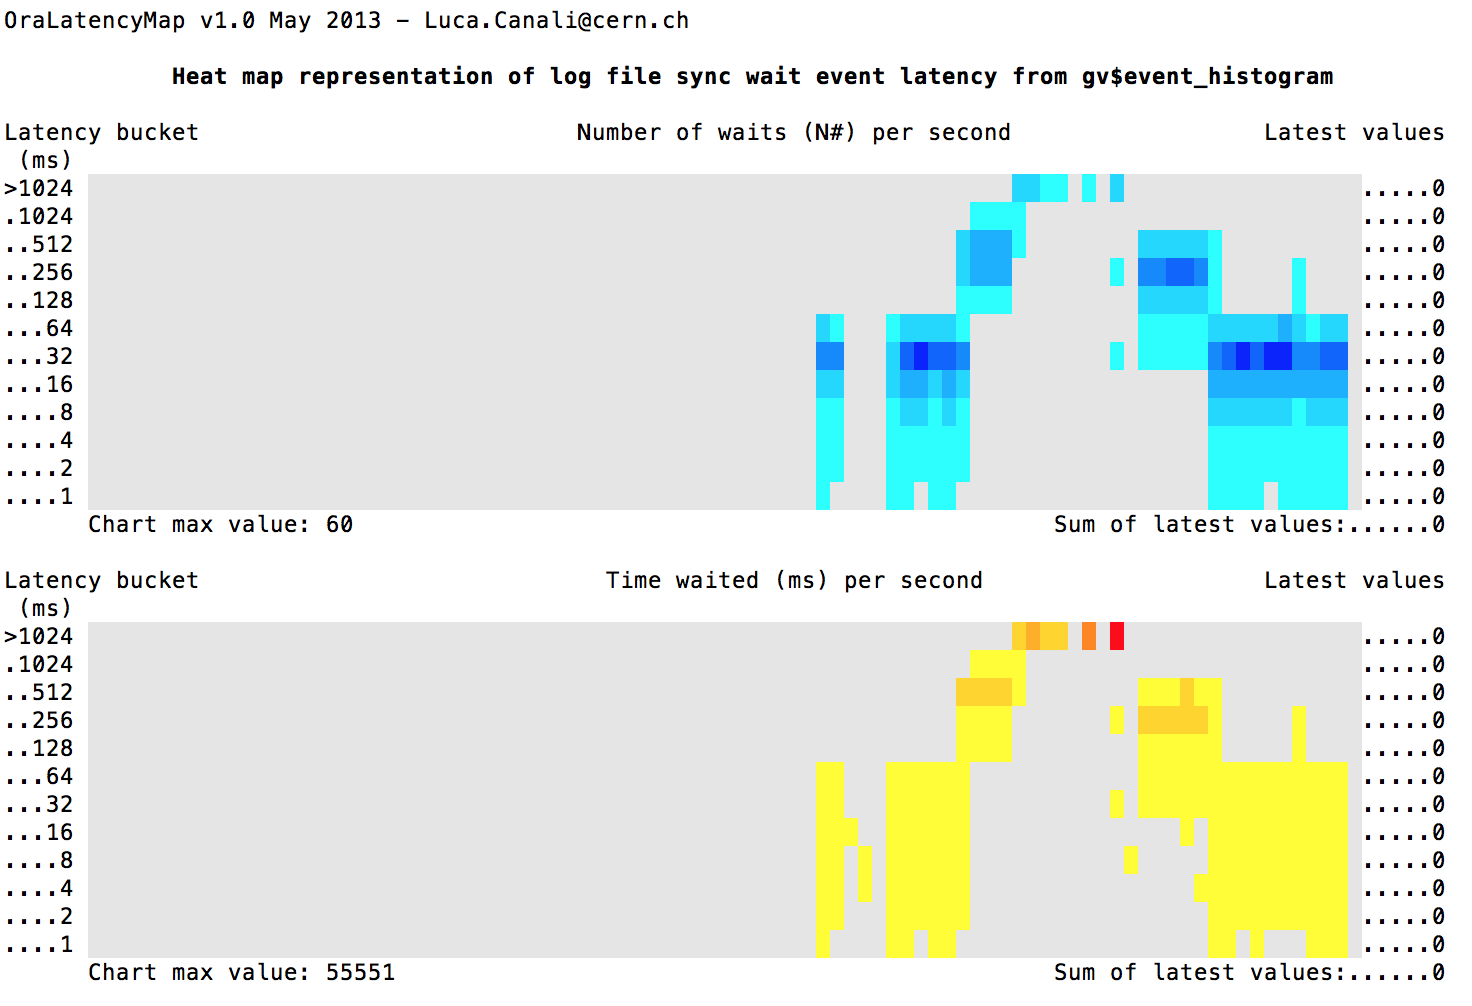
The above is so cool.
The graphic shows the latency heatmap of “log file sync”. I was running a swingbench load and at the same time throttling I/O such that latencies started off good then got worse and then back to normal.
All I did was type
sqlplus / as sysdba
@OraLatencyMap_event 3 "log file sync"
This was created by Luca Canali , see http://externaltable.blogspot.com/2013/05/latency-heat-map-in-sqlplus-with.htm
Now if we combine this monitoring, with the I/O throttling documeted by Frits Hoogland here https://fritshoogland.wordpress.com/2012/12/15/throttling-io-with-linux/ , we can really have some fun and even draw latency words:
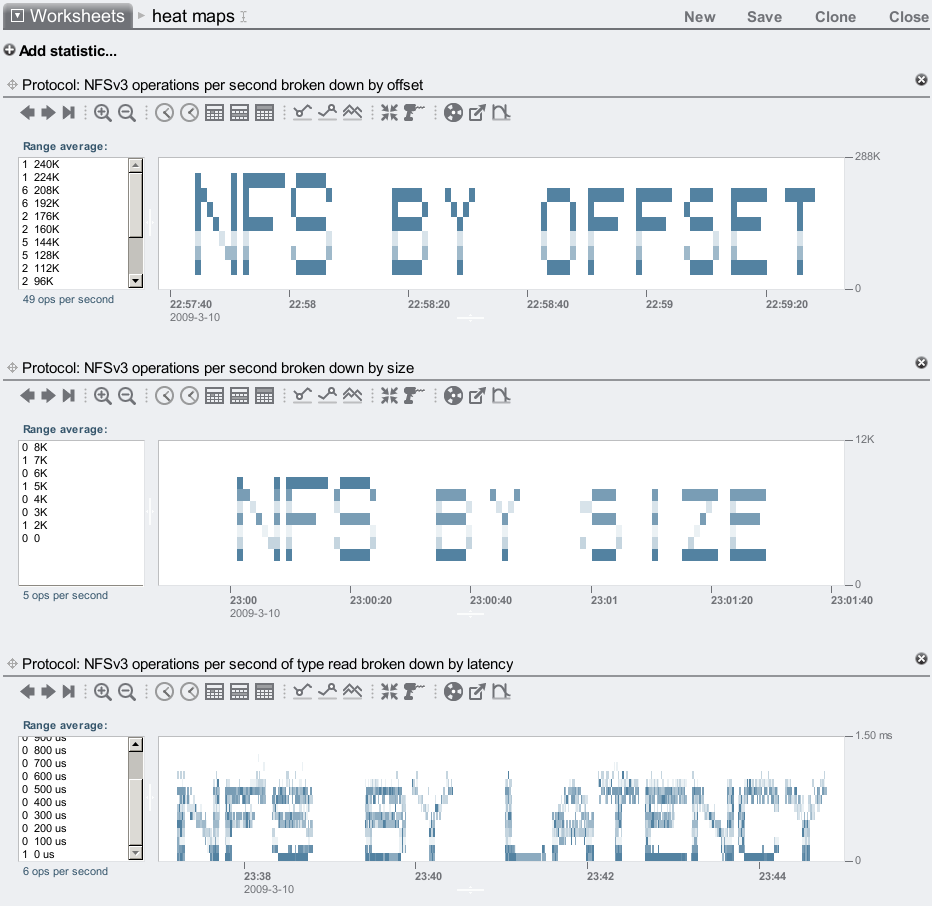
The above words in latency heat maps are from http://dtrace.org/blogs/brendan/2009/03/17/heat-map-analytics/ where there is information on heat maps. In the graphic at the top of the page I put lgwr in an I/O write throttle group and played with the I/O throttle. The full steps are: Run an auto refresh color coded heatmap on “log file sync” in sqlplus by typing
sqlplus / as sysdba
@OraLatencyMap_event 3 "log file sync"
where OraLatencyMap_event.sql and OraLatencyMap_internal.sql are your current directory or sqlpath
Now to play with LGWR latency with cgroup throttles see
https://fritshoogland.wordpress.com/2012/12/15/throttling-io-with-linux/
# install cgroups on 2.6.24 LINUX or higher
yum intall cgroup

# setup /cgroup/blkio
grep blkio /proc/mounts || mkdir -p /cgroup/blkio ; mount -t cgroup -o blkio none /cgroup/blkio
cgcreate -g blkio:/iothrottle

# find the device you want
df -k
# my Oracle log file divice was
ls -l /dev/mapper/vg_source-lv_home
lrwxrwxrwx. 1 root root 7 May  1 21:42 /dev/mapper/vg_source-lv_home -> ../dm-2

# my device points to /dev/dm-2
ls -l /dev/dm-2
brw-rw----. 1 root disk 253, 2 May  1 21:42 /dev/dm-2

# my device  major and minor numbers are "253, 2"
# create a write throtte on this device (for read just replace "write" with "read"
# this limits it to 10 writers per second
cgset -r blkio.throttle.write_iops_device="253:2 10" iothrottle

# look for lgwr
ps -ef | grep lgwr
oracle   23165     1  0 13:35 ?        00:00:19 ora_lgwr_o1123

# put lgwr pid into throttle group
echo 23165     >  /cgroup/blkio/iothrottle/tasks

# now play with different throttles
cgset -r blkio.throttle.write_iops_device="253:2 1" iothrottle
cgset -r blkio.throttle.write_iops_device="253:2 10" iothrottle
cgset -r blkio.throttle.write_iops_device="253:2 100" iothrottle
cgset -r blkio.throttle.write_iops_device="253:2 1000" iothrottle

# if you are finished then delete the throttle control group
cgdelete  blkio:/iothrottle
May 22, 2013: Full day of Oracle hands on labs, free! (bay area)
May 1st, 2013 Oracle OTN is hosting a full day of free* hands on Oracle labs on May 22, 2013 in Pleasanton, Ca
-
Re-engineering Your Database Using Oracle SQL Developer Data Modeler 3.1
- Learn how to use SQL Developer Data Modeler to import your database schema, make changes and generate the modified DDL.
-
Testing and Debugging Procedures using SQL Developer 3.1
- Learn how to use Application Express to load data into your database, create an application with a variety of page types (including a interactive report, calendar and data load wizard).
-
Building an Application using Oracle Application Express: Part 1 and part 2
- Learn how to use Application Express to load data into your database, create an application with a variety of page types (including a interactive report, calendar and data load wizard).
Learn rapid application development (RAD) with Oracle tools. Veteran OTN instructor David Peake will lead an end-to-end, soup-to-nuts session on using Data Modeler to design a database, SQL Developer to build tables, and Application Express to build a web-based application. Attendees must bring their own laptop containing the Developer Day virtual machine fromhttp://goo.gl/cvBo8. AEach session in this track builds upon the previous session so please plan on attending all four sessions in this track.
To participate in the labs you have to be a member of NoCOUG but for a limited time we are offering a limited number of free one day passes to this special OTN event. Please contact me at [email protected] if you are not a member of NoCOUG but would like to attend the OTN labs. If you are already a member of NoCOUG and would like to attend the lab sessions, register here.

Not only will there be a full day of OTN labs but there will be awesome talks by renown Oracle speakers.
If you are a DBA type you may be thinking “why should I attend the OTN labs?” My response would be: Why broaden your horizons? Why get out of your comfort zone? Why learn new skills? Why bother taking advantage of the magnificent educational smorgasbord that we call NoCOUG? When ever I have the chance I try and learn new skills. One never knows what tomorrow will bring and having a wide array of skills will allow me to grow into new areas that prove in more demand or more interesting.
Installing OEM for second instance
April 21st, 2013Had a machine running the default database from the Oracle 11.2.0.3 installer. This instance was called o1123.
I then created a second database by hand (with crdb.sh for swingbench and slob tests) instead of dbca (maybe that was a mistake) and then I wanted to acccess OEM. The second instance was called SOE60G ( a 60GB swingbench dataset database)First tried to start up dbconsole:
$ emctl start dbconsole
OC4J Configuration issue.
 /home/oracle/oracle1123/product/oc4j/j2ee/OC4J_DBConsole_perf234-target1.delphix.com_SOE60G
not found.
OK, missing file. EM wasn’t configured for this database, make sense. Let’s configure it
$ emca -config dbcontrol db -repos create
...
SEVERE: Dbcontrol Repository already exists.
Fix the error(s) and run EM Configuration Assistant again in standalone mode.
Looks like there is already a repository, so lets configure EM with out making the repository
# emca -config dbcontrol db
WARNING: ORA-00942: table or view does not exist
SEVERE: The existing database you have specified has Grid Control repository.
This operation is not supported.
Hmm, what table is missing? Put db in sql trace mode to see what SQL statement ran into the 942 error
sqlplus / as sysdba
alter database set sql_trace=true
exit
rerun and grep for 942 in trace files in user_dump_dest
cd /home/oracle/oracle1123/diag/rdbms/soe60g/SOE60G/trace
grep 942 *
this show a dozen or so files.
Open each one up and searched for 942 and found two distinct SQL queries:SELECT ATTRIBUTE,SCOPE,NUMERIC_VALUE,CHAR_VALUE,DATE_VALUE FROM SYSTEM.PRODUCT_PRIVS WHERE (UPPER('SQL*Plus') LIKE UPPER(PRODUCT)) AND (USER LIKE USERID) select count(*) from sysman.mgmt_versions where status > 0 and component_mode like 'SYSAUX' and component_name in ('DB','CORE')
The first table is from not having run $ORACLE_HOME/sqlplus/admin/pupbld.sql
Second is the problem emca was running into. Let’s look at sysman’s objects and see what’s there.sqlplus sysman/sys select object_name from user_objects; -> no rows returned
OK, sysman looks empty , let’s drop it and recreated it
sqlplus / as sysdba
drop user sysman cascade;
drop user MGMT_VIEW cascade;
someone’s blog had suggested dropping the following but I didn’t
# drop role MGMT_USER;
# drop public synonym MGMT_TARGET_BLACKOUTS;
# drop public synonym SETEMVIEWUSERCONTEXT;
#                                                        host      port  SID
# $ORACLE_HOME/sysman/admin/emdrep/bin/RepManager antarctic 2483 sprod -action drop
# ./emca -repos create
rerun emca
$ emca -config dbcontrol db -repos create
....
Do you wish to continue? [yes(Y)/no(N)]: y
Apr 20, 2013 7:27:51 AM oracle.sysman.emcp.EMConfig perform
INFO: This operation is being logged at
/home/oracle/oracle1123/cfgtoollogs/emca/SOE60G/emca_2013_04_20_07_27_38.log.
Apr 20, 2013 7:27:51 AM oracle.sysman.emcp.ParamsManager checkListenerStatusForDBControl
WARNING: ORA-01031: insufficient privileges
Apr 20, 2013 7:27:51 AM oracle.sysman.emcp.EMConfig perform
SEVERE:
Database connection through listener failed. Fix the error and run EM Configuration Assistant again.
Some of the possible reasons may be:
1) Listener port 1521 provided is incorrect. Provide the correct port.
2) Listener is not up. Start the Listener.
3) Database service SOE60G is not registered with listener. Register the database service.
4) Listener is up on physical host and ORACLE_HOSTNAME environment variable is set to
 virtual host. Unset ORACLE_HOSTNAME environment variable.
5) Listener is up on virtual host. Set environment variable ORACLE_HOSTNAME=<virtual host>.
6) /etc/hosts does not have correct entry for hostname.
Notice the ORA-01031. Hmm, I can connect as sqlplus / as sysdba but connecting as sysdba through the listener requires a password file. Let’s see if password files are set up
sqlplus / as sysdba
show parameters remote_login_passwordfile
remote_login_passwordfile            string      EXCLUSIVE
that’s set correct, but is there a password file?
cd $ORACLE_HOME/dbs
ls orapw$ORACLE_SID
ls: cannot access orapwdSOE60G: No such file or directory
not there, let’s create it
orapwd FILE=orapw$ORACLE_SID ENTRIES=30
now emca works !
Now what URL to I use to access OEM for the second database?
It’s the same URL as the first database but with different port. We can find the ports for each database in the following filecat $ORACLE_HOME/install/portlist.ini Enterprise Manager Console HTTP Port (o1123) = 1158 Enterprise Manager Agent Port (o1123) = 3938 Enterprise Manager Console HTTP Port (SOE60G) = 5500 Enterprise Manager Agent Port (SOE60G) = 1830
Post script
After the above steps, one of the bizarre things I ran into was being able to access OEM database page in Chrome but nothing else. Coming into OEM, I’m first asked for a login. I login as system, I see the database home page, then if I click on the performance tab, then I get prompted for the login again. I then login again, and I’m back at the database home page. No matter what tab I click, I end up back at the database home page after giving login credentials.
In Firefox, though once I login, I can go to any of the other tabs and it works!PS when running emca above I was prompted for a number of variables. didn’t try this, but looks like all the arguments can be given in the command line
emca -repos create -silent -ORACLE_HOSTNAME perf234-target1 -SID SOE60G
-SERVICE_NAME SOE60G -ORACLE_HOME /home/oracle/oracle1123/product
 -SYS_PWD sys -DBSNMP_PWD sys -SYSMAN_PWD sys
-HOST_USER oracle -HOST_USER_PWD  -PORT 1521
Post Script II:
Never seen this one before and it was super annoying. I set up a VM in Virtual Box on my Mac with LINUX and Oracle 11.2.0.3 and OEM. On the VM I could access OEM but not from my Mac. On my Mac I kept getting
This webpage is not available
The connection to 192.168.1.138 was interrupted.Turns out the problem was that I was using “http://” and not “https://” , rrrreferences
- http://dbataj.blogspot.com/2011/09/severe-dbcontrol-repository-already.html
- http://sheltong-appsdba.blogspot.com/2010/07/configuring-em-on-oracle-11g.html
- https://forums.oracle.com/forums/thread.jspa?threadID=1773883
Join Me at COLLABORATE 13
April 5th, 2013
I’ll be speaking on Mon, Wednesday and Thursday:
- Boosting performance on reporting and development databases
April 8, 2:30-3:30pm (Mile High Ballroom 2B) - Database virtualization: accelerating application development
April 10,1:00-2:00pm (Mile High Ballroom 2B) - NFS tuning for Oracle
April 11, 8:30-9:30am (Mile High Ballroom 3A)
Attend COLLABORATE online
IOUG Forum for the Best in User-Driven Oracle Education and Networking
Have you made your Oracle training plans for 2013? As an IOUG RUG leader, I’d like to extend a personal invitation to the conference that I continue to attend for truly valuable personal and professional growth- COLLABORATE 13 – IOUG Forum, April 7-11 at the Colorado Convention Center in Denver, CO.
COLLABORATE is interactive: have your most difficult questions answered by other IOUG Oracle experts who’ve been there and come out swinging.
COLLABORATE is diverse: attend education sessions across all of the tracks offered at IOUG Forum, or pick the one that fits you best! Choose from Database, Business Intelligence, Big Data, Exadata, Security and more!
COLLABORATE is personal: tap into the shared resources of hundreds of IOUG members, Oracle ACEs and more! Meet new friends and contacts throughout the week and strengthen ties with existing business partners.
COLLABORATE is an awesome big conferences of over 6000 attendees with many opportunities to network, learn new technology and see what is happening in the industry.
By registering specifically with IOUG for COLLABORATE 13, you’ll reap the following benefits:
- Pre-Conference Workshops
On Sunday, April 7, IOUG offers an extra, comprehensive day of Oracle training complimentary for IOUG Forum attendees. - IOUG Curricula
The IOUG Curricula are designed to give well-rounded training and education on specialized topics, chosen by peers, throughout COLLABORATE. - IOUG IT Strategic Leadership Package
Get the chance to discuss corporate strategy with senior IT management and improve your skills at influencing without authority, present business cases and help develop business solutions for your company.
- Access to hands-on labs
Sessions on Upgrade to the Latest Generation of Oracle Database and Consolidate your Databases Using Best Practices, Hacking, Cracking, Attacking – OH MY! and RAC Attack. - Networking
Admission to IOUG’s exclusive networking activities, including our Sunday evening reception - Conference Proceedings
Online access to conference proceedings before, during and after the event
You will also be able to attend education sessions offered by the OAUG and Quest user groups with your COLLABORATE 13 registration through the IOUG. Make plans to join me and thousands of your Oracle peers to soak in the solutions at this unique Oracle community event.
If you are an Oracle technology professional, be sure to secure your registration through the IOUG to obtain exclusive access to IOUG offerings.
Please contact IOUG headquarters at if you have any questions.
I hope to see you in Denver!
Best Regards,
Kyle Hailey
Where to begin with Oracle and SQL
March 22nd, 2013 Seeing more and more questions on “where do I start with Oracle if I want to be a DBA?” My perspective is a bit off since I’ve been surrounded by Oracle for over 20 years. I hardly remember what it was like to start with Oracle and starting with Oracle now in 2013 is quite different than starting with Oracle in 1990.
Here is my list and everything on this list is excellent. I’m sure I missed a few good ones, but maybe people can add them in the comments.
Start with Oracle Docs, they are free and good!
- http://www.oracle.com/pls/db112/homepage
Get the best books and read them
- Expert Oracle Database Architecture by Thomas Kyte
- Troubleshooting Oracle Performance by Christian Antognini
- Refactoring SQL Applications by Stephane Faroult
A bit old, but this is a great overview of Oracle: Practical Oracle 8i by Jonathan Lewis
After you have read the above, dive into the important details:
- Optimizing Oracle Performance by Cary Milsap
- Oracle Core Essential Internals by Jonathan Lewis
- Oracle Wait Interface by R Shee, K Deshpande, K. Gopalakrishnan
If you know SQL but want to get great at SQL performance, read these books
- Cost-Based Oracle Fundamentals by Jonathan Lewis
- SQL Tuning by Dan Tow
- Relational Database Index Design and the Optimizers by Tapio Lahdenmaki
Join Online discussions and follow blogs
- Oracle-L forum: www.freelists.org/list/oracle-l
- OTN forums: https://forums.oracle.com/forums
- Oaktable blogs: http://www.oaktable.net/oakienews
Create your own Oracle blog aggregator, here is mine: http://oracle.collected.info/
Go to conferences. First of all your local Oracle user groups and if you have the time and resources then go to the bigger conferences:
- Hotsos
- RMOUG
- UKOUG


Member since 2002
 Oracle L
- ASM Filter Driver and Exadata
- Re: High response time with top 'Other' and 'application' wait class
- Re: High response time with top 'Other' and 'application' wait class
- Re: High response time with top 'Other' and 'application' wait class
- Re: High response time with top 'Other' and 'application' wait class
- RE: [URL Verdict: Neutral][Non-DoD Source] Re: [External] : JSON
- RE: [External] : JSON
- RE: [URL Verdict: Neutral][Non-DoD Source] Re: [External] : JSON
- Re: High response time with top 'Other' and 'application' wait class
- Re: High response time with top 'Other' and 'application' wait class
recent comments